Sunday, August 21, 2011

New Haircut + Fave Hair Product :)

I have been obsessing over short haircuts!  
Figure its time to get a new style since my hair is a bit longer now, plus it's been clumping near my forehead.  FYI, my hair was previously a short bob. :)

I narrowed down to about 3 hairstyles:

Pictured from top to bottom:  
Seung Yeon from the kpop band Kara, she is so cute in this short style.
Jung Nicole also from Kara, I love the layering in the back!
Model from Popteen magazine, anybody know her name?  I love the straight hair framing her face and the arrangement of hair at top.


I've got pretty thin/fine hair and need lots of volume at the top of my head to balance out my face.  I've also gained a bit of weight recently and its showing, oops :X  For this concern, I wanted hair that will cover both sides of my face, to make my face look more slim. :)

So I took the above three pictures to my local hairstylist and asked her which she thinks would work best on me.  Instead of just picking one, she said she will cut something *similar* and ensure there would be the face framing layers I wanted. 


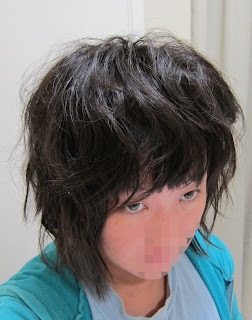
Here is the result:
Wore minimal makeup, felt the need to pixelize my nose+lips :)

I like all the volume I have on the top now :)

Excuse the dead eyes X.X, I wasn't wearing much eye makeup :P
Though I didn't perm my hair, this was the result of curling my hair with a tiny 1/2" Revlon hair straightener.  

I don't like putting hair product at my roots, it makes my scalp itchy :P  Anybody else out there like that?  hehe :) 
I managed to find mini solutions to get around using product at my scalp.
1)  For lots of body, use a mini crimper at the roots, make sure its hidden by uncrimped hair at the top.
2)  Use hair product at least 3" - 4" away from the roots.
3)  Use products that are lightweight.  I've had good experience with glazes and sprays.


My favorite hair product, Chi thermal protection spray.  
It protects your hair AND keeps the shape of your hair for a long time!  For me it can last as long as the next day, woot!

Tuesday, August 2, 2011

Extra Sensitive Skin MODE + Foundation Reviews!

The condition of my skin, specifically eczema on my face, has been at it's worse.  Things haven't been this bad since 2003.  Every couple days it will go through the cycle of itchy-peely-sensitive-red, to just peely, then smooth from all the healing.  Afterwards it will start all over again.

I've already seen a dermatologist and feel I have exhausted my options there.  I can no longer continue to take the prescription allergy meds, which makes me groggy throughout the day.  I also cannot rely on steroid creams, which has already thinned out my skin as a child.

I took the next step and started seeing an allergist.  Turns out I'm allergic to different tree and grass pollen that's been in flying in the San Francisco Bay Area air.  I'll be taking de-sensitizing allergy shots starting next week.  Even though the process may take up to 6 months to take effect, I am pretty excited to get my skin allergies under control!

With my skin sensitivy to it's maximum, I feel compelled to share...

My Sensitive Skincare Routine

1.  Wash face with Neutrogena Extra Gentle Skin Cleanser.
I pump once or twice of the product into my hand, then massage my face.  Rinse off with cool water.  Dab face with a clean towel.

2.  Spray a generous amount of Evian Facial Spray.
Pat well into skin, this pushes more moisture into your skin.  I must say, this product is the most sensitive skin freindly ever.  While it may not be the most moisturizing, I can usually rely on it to NOT sting my face! :)  Btw, if it does sting my face, it means eczema has caused my skin to be raw.
3.  Apply Clinique's Comfort on Call.
Wait for the evian to be absorbed before applying.  Gotta love Clinique for their truly sensitive freindly products.  This particular cream is even meant for people with eczema, yay!


I know this is really bad but, I've also been using makeup...

I could no longer face my co-workers with my sickly peeling skin!   I've been experimenting with what I think is the most sensitive freindly makeup products I have.  Here's what worked:

1)  Combining Elisha Coy Always Nuddy BB 24 (Soothing & Moisturizing Anti-Irritant Blemish Balm) and Laura Mercier Tinted Moisturizer (Regular, *not* the oil free one, in Sand). 
2)  Bobbi Brown Extra Repair Foundation


Foundation Reviews


Elisha Coy Always Nuddy BB 24 (Soothing & Moisturizing Anti-Irritant Blemish Balm) 
This has a very strong gray cast, and appeared too pale for my NC35 skin.   However, it was much less irritating to my skin than Dr. Jart Premium Gold Label BB cream.  Thankfully I managed to make good of it still, mixing with tinted moisturizer.
Rating:  7/10


Laura Mercier Tinted Moisturizer 
I bought this as part of the Laura Mercier Flawless face kit in Sand at Sephora.  Note that there is also an oil-free version.  I've got pretty dry skin so I guess I bought the oil version? hehe
I must give this product a lot of credit.  It feels cooling and soothing when applied to my face, it does provide moisture, doesn't irritate my sensitive skin, and most impressive of all, it covers about 80% of the redness on my face and evens my skintone.  Previous tinted moistuizers that I've used before have given light coverage at best, but with this product I can really say it provides medium dewy coverage.   Mixing this with my bb creams have worked well as Sand is slightly too dark for my skin.  I am currently using a 1 to 1 ratio of bb cream to Laura Mercier tinted moisturizer.  The coloring is working okay so far though it's still a little too light.  I plan to try a 1 to 2 ratio next for a darker and more moisturizing mix.
Rating:  9/10


Bobbi Brown Extra Repair Foundation
From the Bobbi Brown website, "Extra Repair Foundation SPF 25 gives skin perfect coverage, moisture & broad-spectrum sun protection. Infused with Shea Butter and Evening Primrose Oil, this does-it-all formula combines all the skin-nourishing benefits of Bobbi’s Extra Skincare with the skin tone-correct color and buildable coverage of her foundations. Over time, it also helps replenish & strengthen skin. Ideal for dry and very dry skin types.  Featured in 'Vogue' Magazine (March 2011) & 'Allure' Magazine (April 2011)."  This sounded just perfect for me, so I grabbed me a sample.
My take:  The BEST color match I have found to date!  My face is naturally lighter than the rest of my body.  The problem with this is, when I apply foundation to match my face, the end result is a stark difference between my face and my neck!  With Mac, I am a NC35, pretty close.  With Bobbi Brown, I am a 4.5 (Warm Natural), it evened out my skin tone without the harsh color difference between my face and neck.   My face and neck finally matches color!   This is a thick cream, it blended well, and surprisingly smells like ginger.  Best of all, it did not irritate my skin and gave medium coverage. The downside, the moisture of this foundation lasted probably about half a day, not enough to get through a complete day work.  :(
Rating: 8/10


MAC Mineralize Satinfinish SPF 15 Foundation
While trying to find my NC color, the Mac saleswoman convinced me to try their mineral foundation.  The result?  My skin tone was evened out, and it was luminous.  However as I looked in the mirror, turning my face side to side, luminous translated to an odd layer of pale over my real skin.  I tried again later at home, it stung my sensitive mode face.  :( Luckily it was only a sample I tried.
Rating:  4/10

Tips to get noticeable lashes for MonoLids

Read if you have short, thin, stick-straight lashes, with a mono-lid like me (helps double-lidders too)!

I've tried what seemed like hundreds of mascaras, methods, tricks, and products to get my lashes noticeable. Here are my tips and things to avoid.

TIP #1 -  Clean your eyelid before applying mascara
Monolids tend to be oilier or "sweaty" near the lashes due from the heavy lid.  This applies even to me with my dry skin! Cleaning takes out the grease on your lashes, your lids, and allows your mascara to adhere.  Cleaning can be as simple as using toner on a cotton pad.


TIP #2 - Go for CURL in your mascara
Why have your lashes appear long and full if its pointing straight down?  Nobody will notice unless they are up and above your lids!  A good curl will make your eyes appear brighter and wide-eyed.  I do realize factors of eyelash length and monolid droop can make this difficult, for this I recommend using 3 coats of Imju Fiberwig Mascara (curl may not last all day though :T).


TIP #3 - Get a waterproof mascara that can hold the curl
My personal faves are Maybelline's Sky High Curves and from Shiseido's Majolica Majorca Japanese line, Lash Enamel Mascara.  They hold the curl AND they don't smudge; I hate panda eyes, where my mascara smudges way too much under my eyes.  Unfortunately, not all waterproof mascaras can hold a curl and most American brands cannot hold a curl, from drugstore brands to designer brands.  If you know of a good curling, non smudge mascara, do let me know! :)


TIP #4 - Use a decent eyelash curler
I know people are raving over the Shu Uemura's curler, and I'll agree it does work better than the average curler. However, I was actually using my mom's hand me down Maybelline for the longest time and it worked for me.  I made sure to sanitize then bought some new rubber pads for it.


TIP #5 - Heat your eyelash curler
Please do this with care. You can heat your curler with a lighter, blow dryer (see video above), or even a curling iron. I like to heat my curler (keeping the curler open) using a lighter about 6" underneath, with a side to side motion, for a couple seconds. Do not heat the part with the rubber padding. Test the heated curler on the back of your hand before trying on your eyelid.


TIP #6 - (Alternative to TIP #3) Purchase a heated eyelash curler
The best one I've tried is Panasonic's heated eyelash curler (EH2351AC). This curler is soooo good at getting my eyelashes curled I've recommended this to all of my close friends and my sister. Every girl I've demonstrated this to is amazed. Sometimes, I don't even bother with the traditional eyelash curler :X . With the proper use, this product allows you to truly curl your lashes instead of bending them. This heated eyelash curler allows you to curl even the the hard to reach areas.  For me, that's the outer corner. What makes this work well compared to other heated curlers on the market, is the lack of space between the "teeth".


With other heated curls, such as the ones pictured above, there is a lot of space between the teeth, meaning more exposure to coils, something I would absolutely avoid in a heated curler.  I purchased a Japonesque one a while ago, it stopped working very quickly, even with fresh batteries :T

How to use a heated eyelash curler:  Remember, do not comb through.  Place and HOLD for several seconds, move to a new place, repeat.    See ekimura's video, can't explain it much better.  :)


TIP #7 - Curl as close to your lash line as possible
Using a metal curler, attempt very slowly to avoid clamping on your lids.


TIP #8  - Curl at least three places on your lash
Using a metal curler, start from closest to lashline, clamp, middle of lash, clamp, outer 2/3 of lash, clamp.  This will lessen the appearance of "bent" lashes. 


TIP #9 - Apply mascara in a zig zag motion
This gets your lashes more separated and decreases the chance of clumps. If you see clumps, keep applying and zig zagging!  Of course, be sure that you are not using super old mascara, you can usually tell when its dry before even applying.

TIP #8 - Use a plastic piece to protect your lids while applying mascara
My mom bought me an eyelash curler with a spring in it. It also included a plastic piece that was curved and used for covering your eyelids while you are applying mascara. I've found that this allows me to put more product on my lashes without having to do the Q-Tip cleanup.